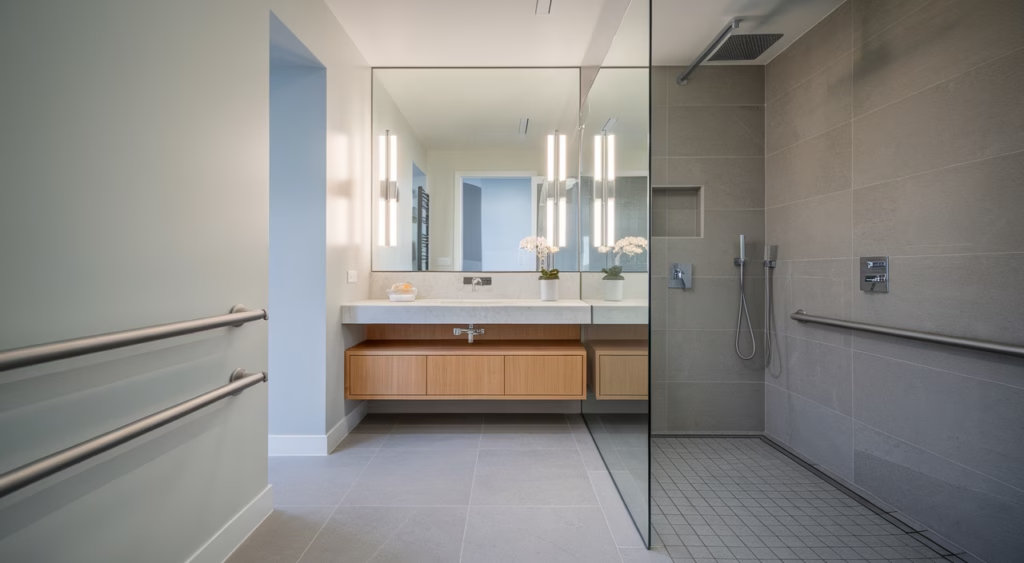
Senior-Friendly Bathroom Design: Essential Tips for a Safe and Stylish Space

Senior-Friendly Bathroom Design: Essential Tips for a Safe and Stylish Space

How to make your bathroom accessible for seniors?

To make your bathroom accessible for seniors, focus on implementing universal design principles that prioritize safety, ease of use, and comfort for all ages and abilities. This involves strategic planning for features like stable grab bars, non-slip flooring, and accessible shower designs, ensuring the space supports independence and prevents common hazards.

Hello! As an interior designer with years of experience crafting beautiful, functional, and, most importantly, accessible spaces, I have witnessed firsthand the incredible difference thoughtful design can make in the lives of seniors and their families. The bathroom, a place of personal care and privacy, should be a sanctuary of comfort and safety, not a source of anxiety. Yet, for many seniors, it often becomes a challenging environment fraught with potential hazards due to changing mobility and physical needs.

The journey of “Bathroom Remodeling for Seniors” is more than just an aesthetic upgrade; it is an investment in well-being, dignity, and independence. My goal with this comprehensive guide is to empower you—whether you are a senior looking to age in place, a family member supporting a loved one, or a fellow professional seeking to expand your knowledge—with the expert advice and practical “senior-friendly bathroom design tips” you need. We will explore how to create a bathroom that not only meets the highest standards of safety and accessibility but also reflects a stylish and inviting atmosphere, proving that functional design never has to compromise on beauty.

When considering “Senior bathroom renovations”, many immediately think of clinical, sterile spaces. But I am here to tell you that is far from the truth. Modern accessible design embraces aesthetics and innovation, offering solutions that seamlessly integrate safety features into elegant surroundings. We will delve into specific design elements, provide step-by-step guidance where appropriate, share insights that mimic real-life examples, and offer descriptive details to help you visualize your ideal “mobility plus bathroom”. Let us transform your bathroom into a safe, comfortable, and truly beautiful space for years to come.

Key Design Elements for Senior-Friendly Bathrooms

Designing an accessible bathroom begins with understanding the fundamental elements that contribute to both safety and usability. These foundational choices will dictate the overall functionality and comfort of the space, ensuring it can accommodate evolving needs. From the moment you step into the bathroom to using each fixture, every detail should be considered through the lens of universal design, making the space intuitive and hazard-free.

One of the first considerations is ample space for maneuvering. While not every renovation can expand the physical footprint of a bathroom, thoughtful layout adjustments can make a world of difference. Consider wider doorways—ideally 34 to 36 inches—and ensuring a clear turning radius of at least 60 inches for wheelchairs or walkers. This crucial space ensures that movement is unrestricted, reducing the risk of bumps or falls. Proper lighting is another often-overlooked yet critical element. Bright, even illumination without harsh glare can significantly improve visibility, especially for those with diminishing eyesight. Incorporate task lighting around the vanity and general ambient lighting throughout the space, possibly with motion sensors for hands-free convenience.

Beyond space and light, contrasting colors play a vital role in an “accessible bathroom”. Using contrasting hues for walls, floors, and fixtures helps define different areas and makes it easier for individuals with visual impairments to navigate the room safely. For example, a light-colored floor paired with darker baseboards or a distinctively colored toilet seat can offer visual cues that prevent missteps.

Installing Grab Bars and Handrails

Elderly person using grab bar for support

Grab bars are perhaps the most essential safety feature in any “Bathroom Remodeling for Seniors” project, providing critical support and stability where it is needed most. However, their effectiveness hinges entirely on correct selection and precise installation. This is not a component to skimp on or install haphazardly; a properly installed grab bar can literally be a lifesaver, preventing falls and allowing for greater independence.

Types of Grab Bars: While the primary function is support, grab bars come in various styles, materials, and finishes to complement your bathroom’s aesthetic. You will find straight bars, angled bars, L-shaped bars, and even flip-up bars (often used beside toilets in smaller spaces). Materials range from stainless steel (most common for durability and corrosion resistance) to chrome, bronze, and even those with a textured or ribbed finish for an enhanced grip. Consider the diameter as well; a bar with a diameter between 1.25 to 1.5 inches is generally comfortable for most hands to grasp securely. For those with arthritis or limited grip strength, a slightly wider diameter might be more suitable, but anything too wide can be difficult to hold effectively.

Critical Placement Guide: The strategic placement of grab bars is paramount. Think about the common points of entry, exit, and transition within the bathroom. Here is a step-by-step guide to optimal placement:

  • Beside the Toilet: Install two grab bars, one on each side of the toilet. They should be horizontal, approximately 33-36 inches from the floor, and extend 12 inches beyond the front of the toilet bowl. For situations where a wall is only on one side, a single horizontal bar on the adjacent wall, or a flip-up bar mounted to the wall behind the toilet, can provide crucial support for sitting down and standing up. These bars greatly assist with mobility and reduce strain.
  • In the Shower/Tub: This is where falls are most frequent due to wet, slippery surfaces. For a bathtub, install two horizontal grab bars: one on the back wall (spanning the length of the tub) and one on the wall opposite the faucet, about 33-36 inches from the tub floor. A vertical bar near the tub edge can also assist with stepping in and out. For showers, a horizontal bar on the back wall and a vertical bar at the entry point are standard. Consider an additional vertical bar near the shower controls. Ensure they are positioned to assist with stability when standing, sitting (if a bench is present), and maneuvering.
  • Near the Vanity: A vertical grab bar on the wall adjacent to the vanity or sink area can provide support for standing or reaching for items. This is particularly useful for individuals who need to lean for stability while performing daily hygiene tasks.

Installation Considerations: Proper installation is non-negotiable for the safety of these devices. Grab bars must be securely mounted into wall studs or blocking. Standard drywall anchors are NOT sufficient and can fail under body weight. If studs are not ideally located, reinforcing the wall with plywood blocking between studs before tiling or finishing is essential. This ensures the bars can support up to 250-300 pounds of force, as required by safety standards. Always consult with a qualified contractor or a specialist in “senior bathroom renovations” to ensure these critical components are installed correctly and safely.

Choosing Non-Slip Flooring Options

The choice of flooring is another cornerstone of a safe, “senior-friendly design”. Wet bathroom floors are notorious for slip-and-fall accidents, making non-slip properties a top priority in any accessible renovation. Beyond safety, the flooring should also be comfortable underfoot, easy to maintain, and contribute to the overall aesthetic of the space.

Optimal Flooring Materials:

  • Textured Porcelain or Ceramic Tiles: When selecting tiles, look for those with a Coefficient of Friction (COF) rating of 0.60 or higher for wet areas. Many manufacturers now produce beautiful tiles specifically designed with a matte or subtly textured finish that provides excellent grip without feeling rough. Avoid highly polished or glazed tiles, which become dangerously slippery when wet. Smaller tiles also offer more grout lines, which inherently provide additional traction.
  • Vinyl Flooring (Sheet or Luxury Vinyl Plank/Tile): Vinyl is an excellent choice for an “accessible bathroom” due to its inherent water resistance, durability, and relatively soft feel underfoot. Sheet vinyl offers a seamless surface, eliminating grout lines where water could collect or that could pose tripping hazards. Luxury Vinyl Plank (LVP) and Luxury Vinyl Tile (LVT) come in a vast array of styles, mimicking wood or stone, and offer good slip resistance, especially those with textured surfaces. They are also warmer than tile and forgiving if a fall were to occur.
  • Rubber Flooring: While perhaps not the most common choice for residential bathrooms, rubber flooring offers superior slip resistance and a cushioned feel. It is highly durable and waterproof, making it a functional option, particularly for showers or areas where maximum grip is essential. Modern rubber options are available in various colors and textures, moving beyond the institutional look.
  • Cork Flooring: Cork is naturally slip-resistant, warm, and soft underfoot, making it comfortable for seniors. It also has natural antimicrobial properties. However, it requires proper sealing and maintenance to ensure its water resistance, and it may not be as durable in high-moisture areas as vinyl or porcelain if not meticulously cared for.

Installation and Maintenance Tips: Regardless of the material chosen, professional installation is crucial to ensure a perfectly level and secure surface, free from raised edges or gaps that could pose tripping risks. For tiled floors, specify a non-slip grout that is resistant to mold and mildew. Regular cleaning with appropriate non-slip cleaners will help maintain the flooring’s integrity and slip-resistant properties over time. Avoid using waxes or polishes that can diminish the natural friction of the surface.

Accessible Shower Designs for Seniors

The shower or bathing area is often the focal point of an “accessible bathroom” renovation, and rightfully so. It is an area where seniors are most vulnerable to falls, but also where thoughtful design can restore significant independence and comfort. “Accessible shower design for seniors” moves beyond simply adding a grab bar; it is about creating a comprehensive, easy-to-use, and inviting experience.

Roll-In Showers and Low-Threshold Showers: These are the gold standard for senior accessibility. The primary goal is to eliminate barriers that require stepping over. A true roll-in shower has no curb whatsoever, allowing direct entry with a wheelchair or walker. This requires careful planning of the bathroom floor’s slope to ensure water drains properly without spilling into the rest of the bathroom. Low-threshold showers have a minimal lip (typically 0.5 to 2 inches), which is much easier to step over than a standard tub or shower curb. These designs significantly reduce the risk of tripping and provide seamless access.

Essential Features for Enhanced Safety and Comfort:

  • Built-In Shower Bench or Seat: A sturdy, built-in shower bench offers a safe place to sit, rest, or perform hygiene tasks, greatly reducing fatigue and the risk of falls. Benches should be firmly affixed to wall studs, comfortable, and wide enough for stability (minimum 17 inches deep and 24 inches wide). Materials should be non-porous and non-slip, like solid surface materials or specific types of tile. Fold-down seats are also an option for smaller spaces, but ensure they are robust and securely installed.
  • Adjustable Handheld Shower Head: A handheld shower head on a sliding bar is a game-changer. It allows users to direct water precisely, whether standing, sitting, or requiring assistance. The adjustable height means it can be comfortably used by people of different heights and in various positions, enhancing the showering experience and independence.
  • Non-Slip Surfaces Within the Shower: Even with a roll-in design, the shower floor itself must have exceptional slip resistance. Textured tiles, rubber mats (securely anchored), or specialized shower pans with integrated non-slip surfaces are crucial. The goal is to maximize traction even when the surface is wet and soapy.
  • Lever-Handle Controls: Traditional knobs can be difficult to grip and turn for those with arthritis or limited dexterity. Lever-style handles are much easier to operate, requiring minimal hand strength. Thermostatic mixing valves are also highly recommended to prevent accidental scalding, ensuring the water temperature remains constant.
  • Adequate Lighting: The shower area needs its own dedicated, waterproof lighting to ensure good visibility. Recessed LED lights rated for wet locations provide bright, clear illumination without glare.
  • Shelving and Storage: Keep frequently used items like shampoo and soap within easy reach. Recessed niches or securely installed shelves at varying heights can prevent bending or stretching, reducing the risk of imbalance.

Designing an “accessible shower option” is about creating an environment where showering is a pleasurable, safe, and independent activity, rather than a perilous task. It is a key component of effective “safe bathroom modifications” and significantly enhances the quality of life for seniors.

Accessible roll-in shower with bench

Essential Bathroom Fixtures for Accessibility

Beyond the fundamental structural changes and shower design, the specific fixtures you choose for your “mobility plus bathroom” play a crucial role in overall accessibility and user comfort. Selecting the right toilet, sink, faucets, and even lighting can profoundly impact daily routines, making them easier, safer, and more dignified for seniors.

Toilets: Comfort Height and Bidet Features

  • Comfort Height Toilets: This is one of the simplest yet most impactful upgrades in “senior bathroom renovations”. Comfort height toilets are typically 17 to 19 inches high (including the seat), compared to standard toilets which are around 14 to 15 inches. This extra height closely mimics the height of a standard chair, making it significantly easier for individuals to sit down and stand up, reducing strain on knees and hips. It is an essential feature for promoting independence.
  • Bidet Seats or Toilets: Integrating bidet functionality offers numerous benefits for seniors. A bidet provides thorough and hygienic cleaning, which can be particularly helpful for those with limited mobility or dexterity challenges, reducing the need for twisting or reaching. Many modern bidet seats come with features like warm water, adjustable spray pressure, air drying, and even remote controls, enhancing comfort and personal hygiene.
  • Supportive Toilet Seats: Consider a sturdy, raised toilet seat or one with integrated arms if a full comfort-height toilet replacement is not immediately feasible. These interim solutions can provide temporary relief, but a full comfort-height toilet with well-placed grab bars remains the superior long-term solution.

Sinks: Wall-Mounted, Lever Handles, and Under-Sink Clearance

  • Wall-Mounted Sinks or Vanities: For individuals using wheelchairs or walkers, providing clear space underneath the sink is vital. Wall-mounted sinks or vanities with open bases allow for easy roll-under access, ensuring comfort and proximity to the faucet. If a vanity is preferred, ensure it is designed with ample knee clearance.
  • Appropriate Height: The ideal height for a universally accessible sink rim is typically 34 inches from the floor, allowing both standing and seated users comfortable access.
  • Lever Handles and Sensor Faucets: As with shower controls, lever handles on sink faucets are far easier to operate than traditional knobs, especially for those with arthritis or weak grip strength. Motion-sensor or touchless faucets are an even better option, eliminating the need to grasp or twist, promoting hygiene, and preventing water waste.
  • Insulated Pipes: If there is exposed plumbing under a wall-mounted sink, ensure it is insulated to prevent burns, especially for wheelchair users who may inadvertently come into contact with hot pipes.

Lighting: Ample, Glare-Free Illumination

  • Layered Lighting: Combine general ambient lighting, task lighting (e.g., around the mirror), and accent lighting to create a well-lit space without harsh shadows.
  • High CRI Bulbs: Use light bulbs with a high Color Rendering Index (CRI) to ensure colors are accurately perceived, which is important for personal grooming and medication tasks.
  • Dimmers and Motion Sensors: Dimmers allow for adjustable brightness, while motion sensors can automatically turn lights on when someone enters, preventing the need to fumble for switches in the dark.

Mirrors: Tiltable or Adjustable

  • Full-Length or Tiltable Mirrors: A mirror that extends lower, or one that can be tilted, allows both standing and seated individuals to see themselves comfortably. This supports independence in grooming routines.
  • Adjustable Height Mirrors: Some modern mirrors are designed to adjust vertically, offering ultimate flexibility.

Each of these fixture choices contributes significantly to making a bathroom truly accessible and user-friendly. By combining these elements, you are not just renovating a space; you are investing in an environment that fosters independence, safety, and dignity for seniors.

Conclusion: Transforming Your Bathroom for Better Senior Living

Embarking on a “Bathroom Remodeling for Seniors” project is one of the most impactful decisions you can make to enhance the safety, independence, and overall quality of life for seniors. As we have explored throughout this guide, the goal is not merely to install a few safety features, but to create a cohesive, thoughtfully designed space that anticipates needs, prevents hazards, and offers true comfort and dignity. The transformation from a potentially risky area to a welcoming and accessible sanctuary is profound.

We have delved into the specifics of “senior-friendly bathroom design tips,” from the critical importance of securely installed grab bars that provide unwavering support to the strategic selection of “best flooring options for senior bathrooms” that mitigate slip risks. We have highlighted the benefits of innovative “accessible shower design for seniors,” emphasizing features like roll-in entry, integrated seating, and user-friendly controls that make showering a relaxing, independent activity. Furthermore, we discussed essential fixtures—comfort-height toilets, accessible sinks with lever handles, and smart lighting solutions—all designed to streamline daily routines and reduce strain.

Remember, an “accessible bathroom” does not have to sacrifice style for functionality. Modern design offers a plethora of attractive, durable, and safe options that can be tailored to any aesthetic preference, ensuring that your renovated bathroom is as beautiful as it is practical. The process of “senior bathroom renovations” is an opportunity to create a space that truly reflects a commitment to aging in place with grace and comfort. By addressing the competitor’s lack of in-depth discussions on specific design elements, providing clear guidance on installations like grab bars, and offering detailed considerations for every aspect of the renovation, we hope to have equipped you with the comprehensive knowledge needed to embark on this important journey.

I encourage you to consider these insights not just as recommendations, but as a roadmap to designing an environment where seniors can thrive, maintain their independence, and feel secure in their own homes. Proactive planning and a holistic approach to “safe bathroom modifications” are key to ensuring that your bathroom truly supports better senior living, allowing for peace of mind for both seniors and their families. Investing in accessibility today is investing in a brighter, safer, and more comfortable tomorrow.

Scroll to Top